Getting Started
Thank you for purchasing AuthorMATIC Support System.
This documentation covers mostly all you need in configuring your own support system.
If you have any questions beyond the scope of this documentation, please do not hesitate to request for help via the support system. Thank you so much!
PLEASE NOTE: Nothing is perfect, no matter how beautiful and perfect it may look. There is always room for improvement. Before you drop a negative comment/rating, kindly let me know what you think can be fixed/done and I will try to fix it. Thank you once again.
Requirements
AuthorMATIC requires Apache/Nginx, MySQL 5.6+/MariaDB 10.1+ and PHP v5.6+ (v7+ preferred), and the following PHP extensions:
- MySQL PDO Driver
- PHP OpenSSL
- PHP cURL
- PHP GD Library
- PHP BC Math
The good news is, most Linux shared hosting services comes pre-installed with theses extensions, so you don't need to worry about that.
Installation
Follow these steps to to have AuthorMATIC install properly on your hosting platform.
- Download the zip file from CodeCanyon.
- Extract the zip file on your system.
- Navigate to extracted folder and upload "AuthorMATIC.zip" to the root(/public_html) directory of your hosting.
- Extract the contents of the uploaded zip file to the same directory using your CPanel File Manager, if applicable.
- Assuming your website is mywebsite.com, navigate to http://mywebsite.com/. It will automatically redirect you to the installation page.
P.S: If you have any .htaccess file in your root directory, remember to save the content before you overwrite it. This file may content important configuration for your host. After uploading the script, you can then edit the .htaccess file and append the saved content.
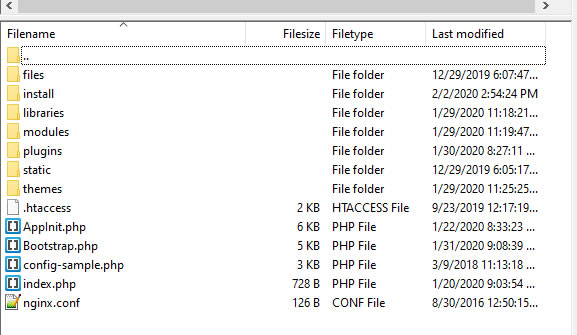
Create a Database Schema for your application
Login to your CPanel and navigate to MySQL Database Wizard:

Enter the new schema name you want to use for the application.
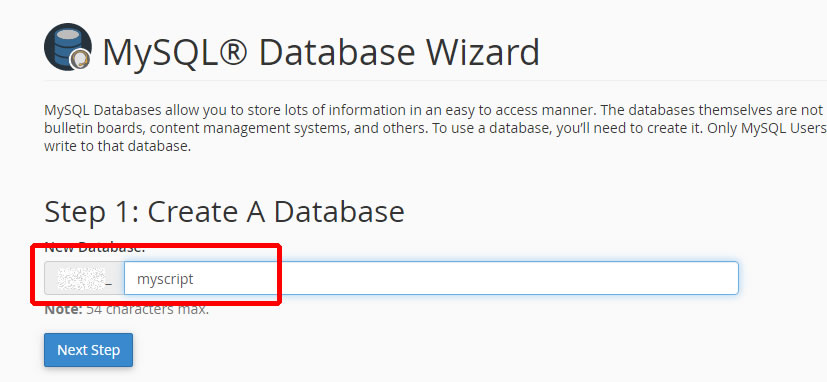
Click on "Next Step" to proceed.
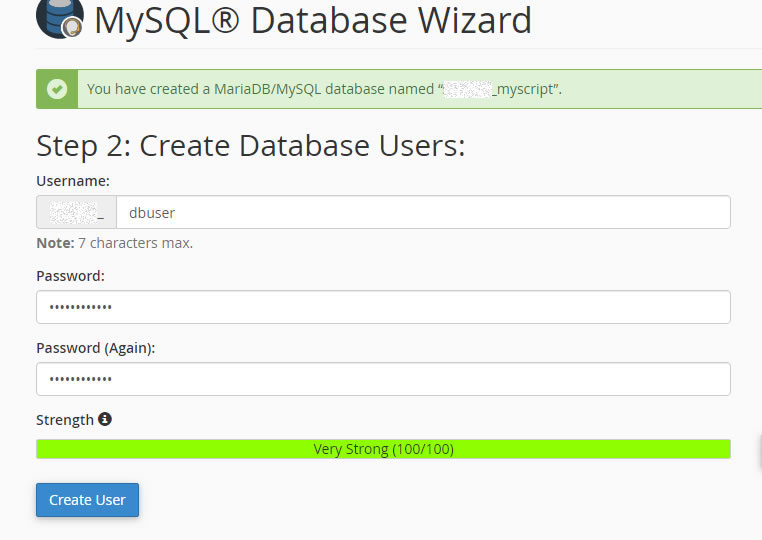
Enter your preferred username and password to create a username and password for the database user.
Click "All Privileges" to give the user full permission to the database schema. Click "Next Step" to complete the task.
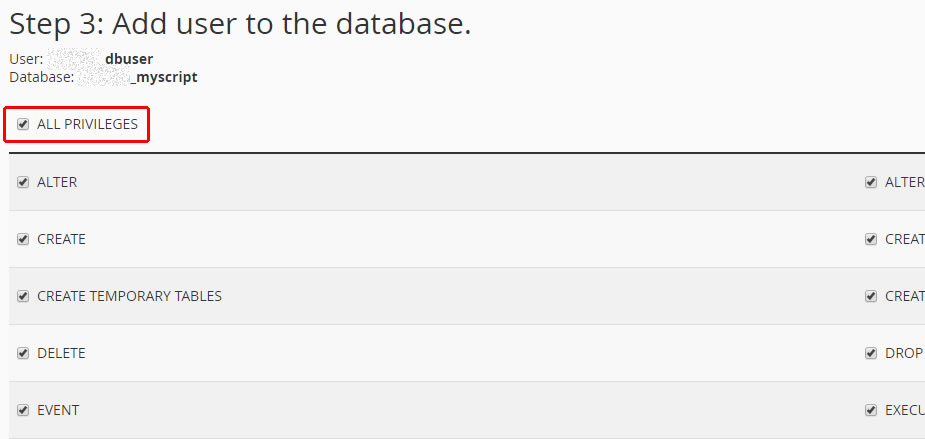
Now you can make use of these details in your installation process.
Watch this video for easy step-by-step installation process.
Navigate to your domain address to begin the installation and follow the guide below:
Free Installation
As part of my interest to make you have a wonderful experience with AuthorMATIC, I will be providing Free Installation Service (FIS) to customers who are having difficulty in completing the installation. However, for easy process on my side, only shared hosting providers(e.g NameCheap, GoDaddy e.t.c) or CPanel powered hosting is qualified for FIS.
You can create a support ticket to this effect: https://dev.silasolatayo.com/account/tickets#new
Troubleshooting
Production environment is different, so I understand if you face any slight difficulty in the configuration/set-up process. AuthorMATIC has an in-built error and exception logger.
You can locate the log files in /files/logz/ directory. You can also rename the log files to your name of choice in config.php file, for security reason(if applicable). With this LOG information, you can easy troubleshoot the error the application is experiencing.
P.S: This log will be very useful if you need to contact support via support ticket: https://dev.silasolatayo.com/account/tickets#new
Updating [Manual]
To manually update to the recent version with any issue or conflict, download the new file(update file) and extract it to a folder on your system.
In that folder, extract AuthorMATIC.zip file to a folder(We need to remove some files to avoid conflict). Delete these files list below and re-zip AuthorMATIC folder:
./install/*
./config-sample.php
./themes/classic/images/*
./themes/default/images/*
The image folder were inclusive to avoid overwriting your uploaded logo and favicon.
Now, ZIP the new AuthorMATIC folder and upload to your server. You can then extract the zipped file on your server using Cpanel File Manager or any relative tool on your server.
P.S: Automatic update will be available soon and it will require a valid license key to use.
Updating [Auto]
As of version 1.3.2+, you can smoothly update AuthorMATIC with few clicks of buttons. However, you need to verify your purchase first to make use of this feature.
Please read this article to see the process: https://dev.silasolatayo.com/article/7/automatic-update-for-authormatic
Licensing
Kindly read the Licensing information for the purchase o this product on https://codecanyon.net/licenses/terms/regular
Please note that you are permitted to use ONLY ONE LICENSE PER USE of this product. If you need further clarification on this, please do not hesitate to contact us.
Configuration
After a successful installation, you can then visit the login page; i.e http://yourdomain.com/pathToAdminarea/ .
"pathToAdminarea/" is the path you set during installation and it's always editable. You can see this parameter in the config.php in your public_html directory
You can always change your admin relative path, if necessary. Please refer to this article for help.
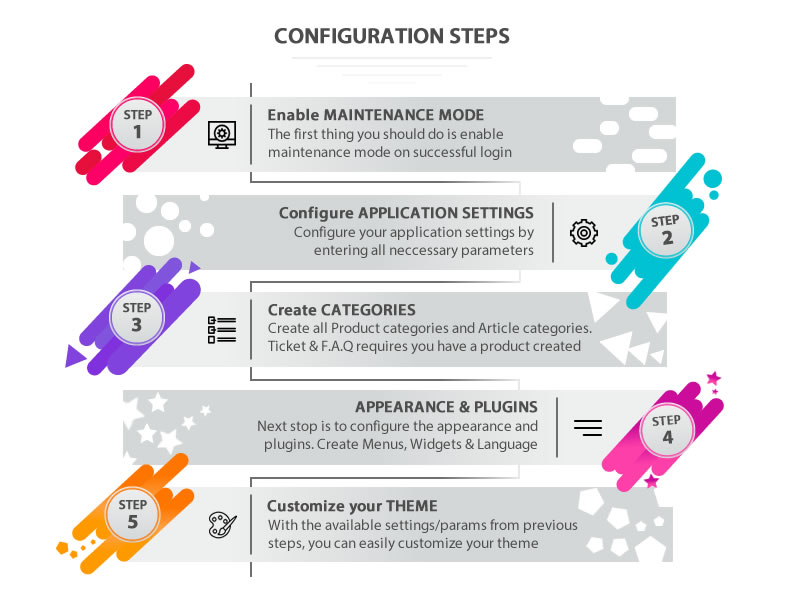
Below is an Infographic steps to ease your configuration process.
Administration Interface
This section define the administrative aspect of AuthorMATIC Support System.
In each sub-section, the process is depicted with alphabets (A, B, C) for each referencing. Follow the process in the order of the alphabets to get expected result.
Dashboard
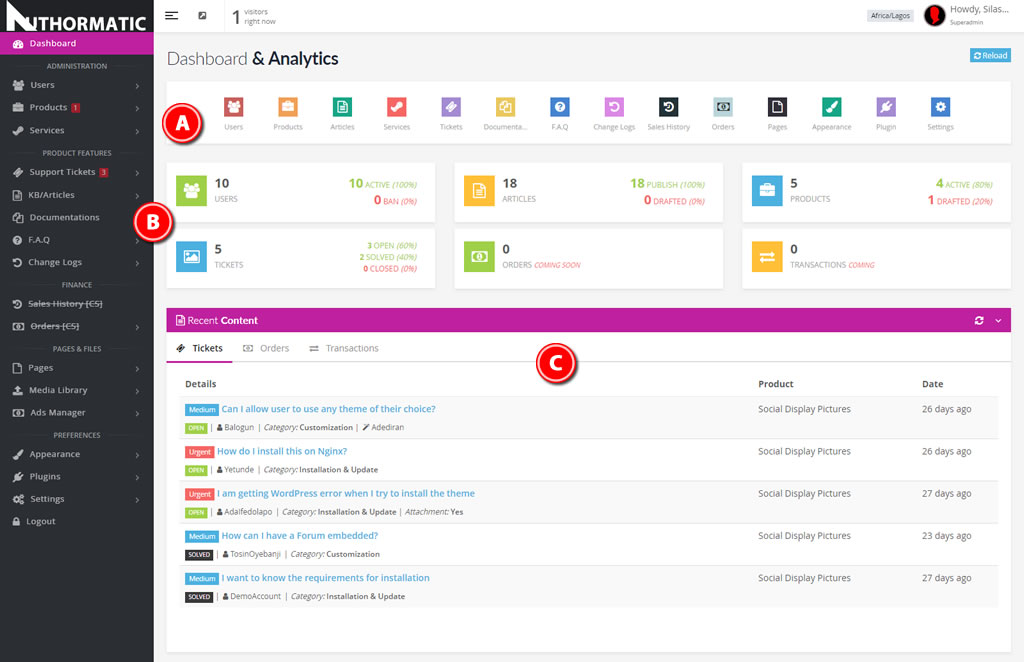
A. QUICK MENU - This icon menu gives quick access to most important sections of the application. You can easily navigate through with these icon links.
B. STATISTICS - Your support system statistics at a glance.
C. RECENT CONTENT - Displays the recent content ranging from Support Tickets, Recent Orders and Transaction (more to be added)
Users & Permissions
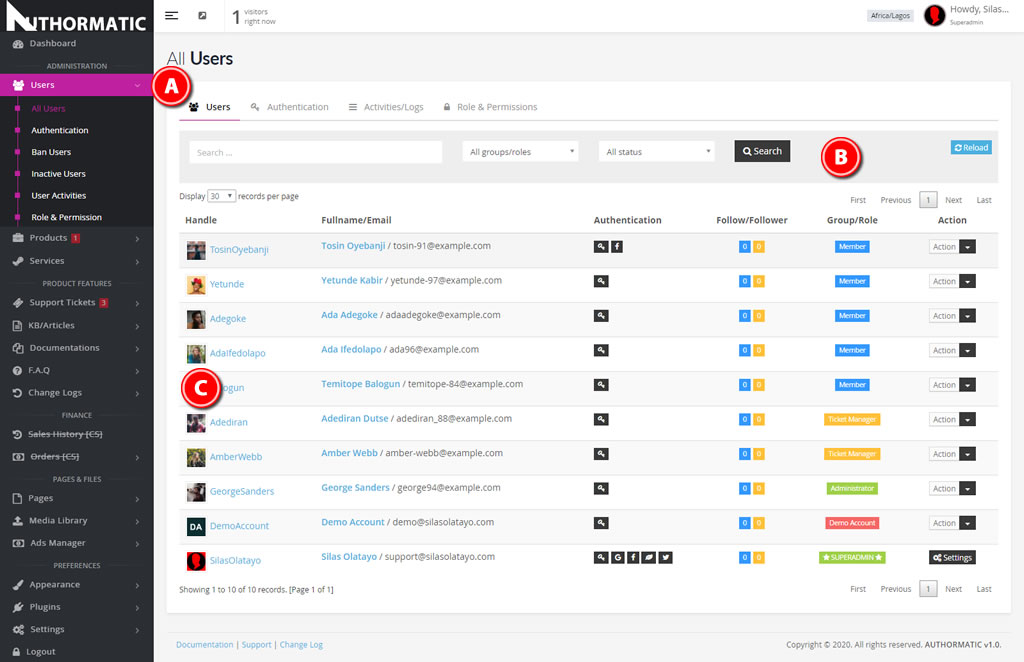
A. USER NAVIGATION - A quick navigation to all User section.
B. SEARCH BOX - Search any user with options of permission assigned or user's status.
C. USER LIST - List of users with brief details and role assigned.
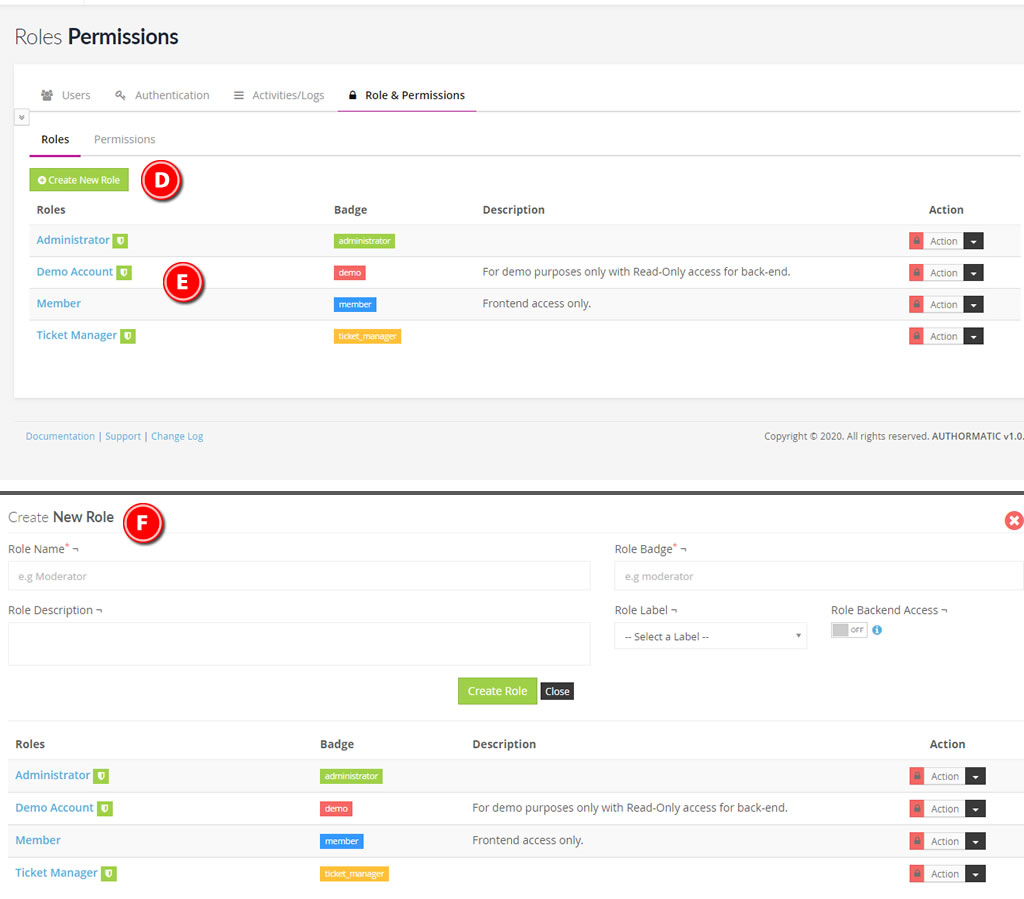
D. NEW ROLE - Create unlimited roles to assign and give permission to your user.
E. ROLE LIST - List of created role you can assign to users.
F. NEW ROLE FORM - Enter a unique name and badge for your new role. The label helps to easily identify which role a user is at a glance. The Back-End access gives any user assigned to this role the ability to login to the admin area.
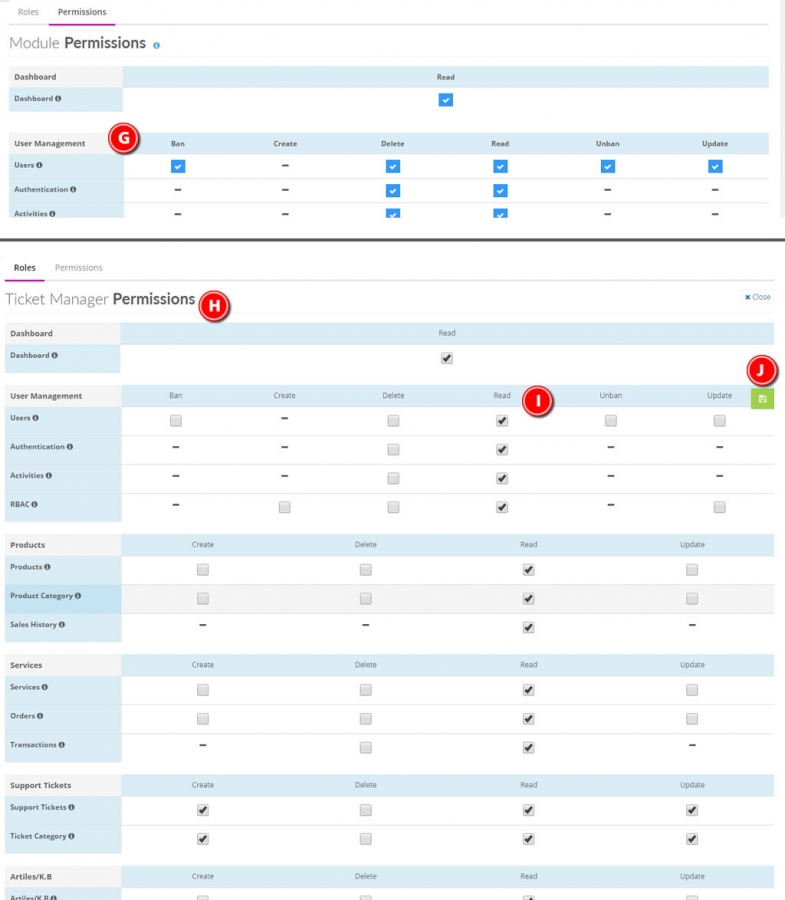
G. PERMISSIONS - Under permission tab, you can see the list of possible permission per module/plugin.
H. TICKET MANAGER PERMISSIONS - This shows the list of enabled/disabled permission assigned to "Ticket Manager" role.
I. QUICK SELECT - By clicking on the list header(e.g Read), you can select all options on that column for the module.
J. QUICK SAVE - A quick save button to save your changes instead of scrolling way down.
Products (NEW & LIST)
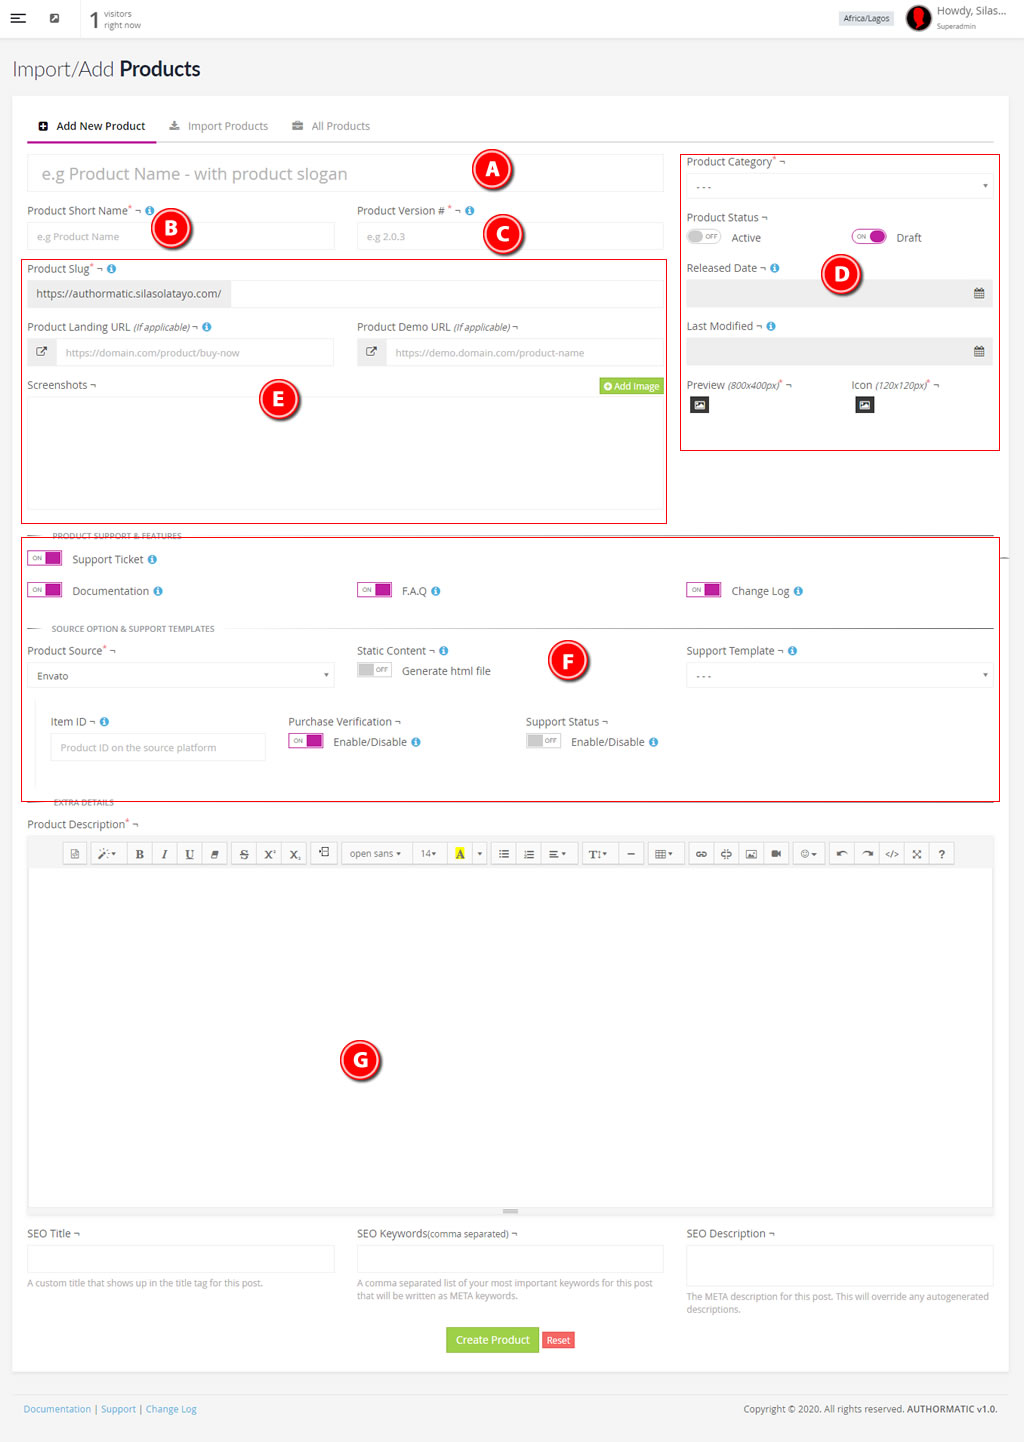
A. PRODUCT NAME - Enter the product full name with slogan, if applicable.
B. PRODUCT SHORT NAME - Am abbreviated name of the product, for easy reference and navigation.
C. VERSION NUMBER - A numeric value to represent the Product current version number. P.S: The latest added Change Log of the product will update this value.
D. Product Category, Product Status (Active will make it accessible publicly), Released and Last Modified Date (P.S: The latest added Change Log of the product will update this value too) , The Preview Image and the Product Icon.
E. Product Slug (Automatically generated from the Product Short Name when unfocused from that field), Landing Page & Demo URL, Screenshots (You can have as many screenshot you want and it's sortable)
F. PRODUCT FEATURES & SOURCE - Enable/disable product features(Support Ticket, Documentation, F.A.Q & Change Log) . You can generate static html file for your product Documentation, F.A.Q and Change Log. If product is on Envato, you can request for purchase verification before user can request for support. You can also check support status on Envato, if expired or not.
G. PRODUCT DESCRIPTION - Give detailed information about your product here.
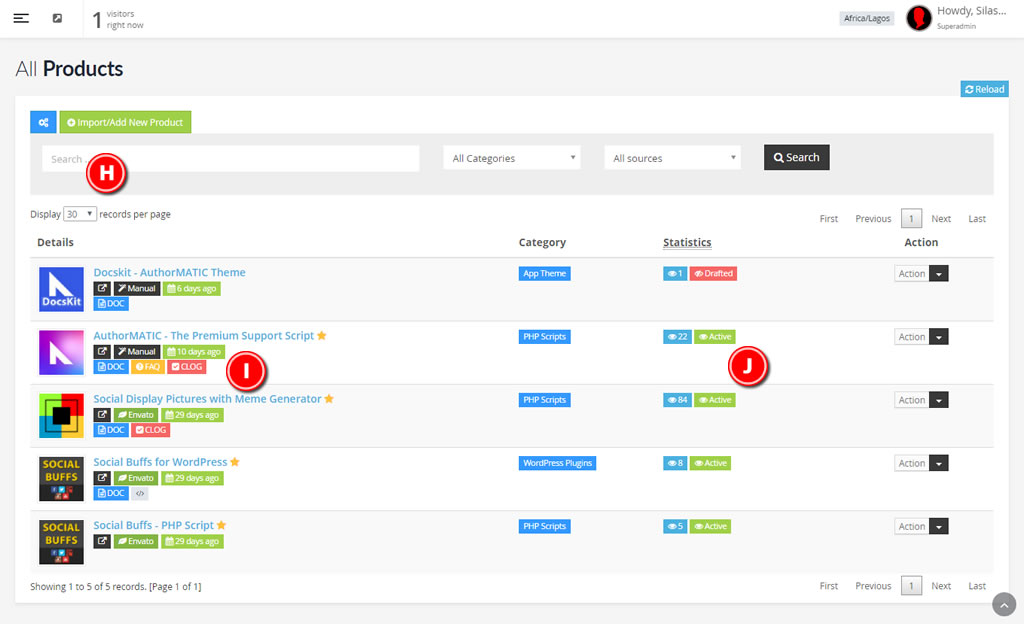
H. PRODUCT SEARCH - Search for any product with the option of category and source.
I. PRODUCT QUICK LINK - You can access each product enabled features here.
J. STATISTICS - Product views and status at a glance.
Knowledge Base / Article
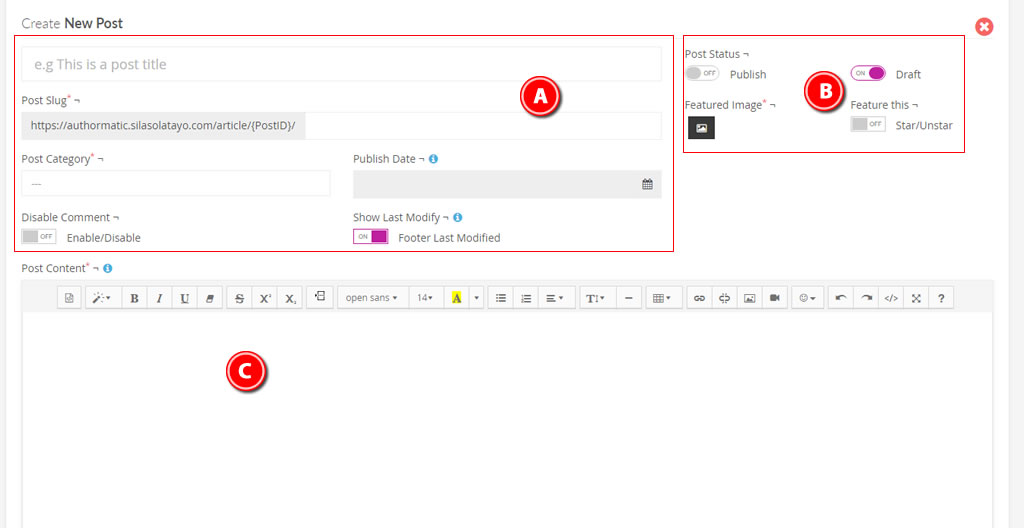
A. ARTICLE TITLE & INFO - Create your post title and assign up to three categories. Post slug are auto generated on blur from the title field. You can disable comment for this article and you can display the last modify date on the front-end.
B. ARTICLE STATUS & FEATURE IMAGE - Set your article status with feature image to display alongside the article. You can also star the post to add it to featured list.
C. ARTICLE DESCRIPTION - Your article content here.
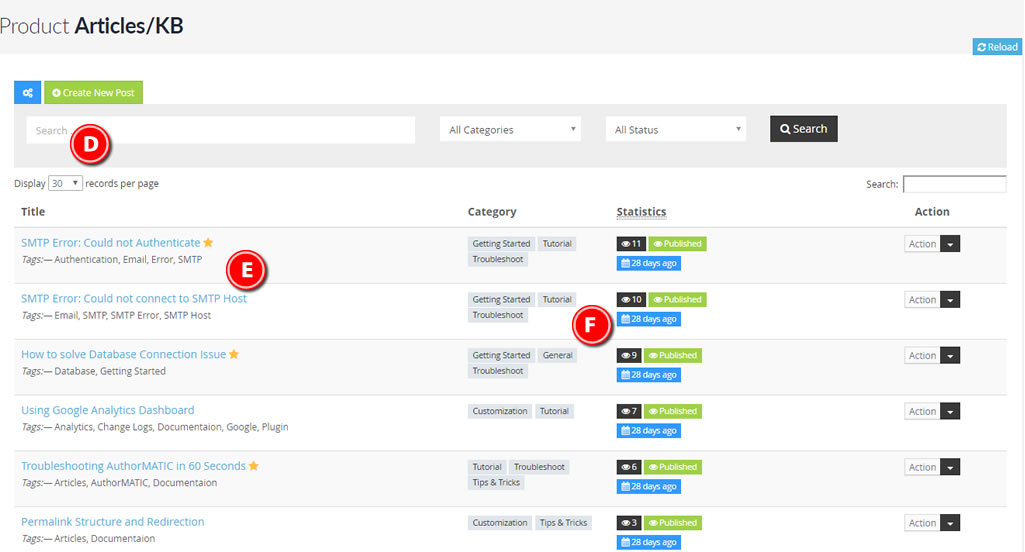
D. ARTICLE SEARCH - Search for any article with a long or short phrase/word; with the option to query by categories and status.
E. ARTICLE TITLE & TAGS - Article link and tags. The yellow star indicate that the article is featured.
F. ARTICLE STATISTICS - All assigned categories, Total Views, Status and Publish Date.
Documentation
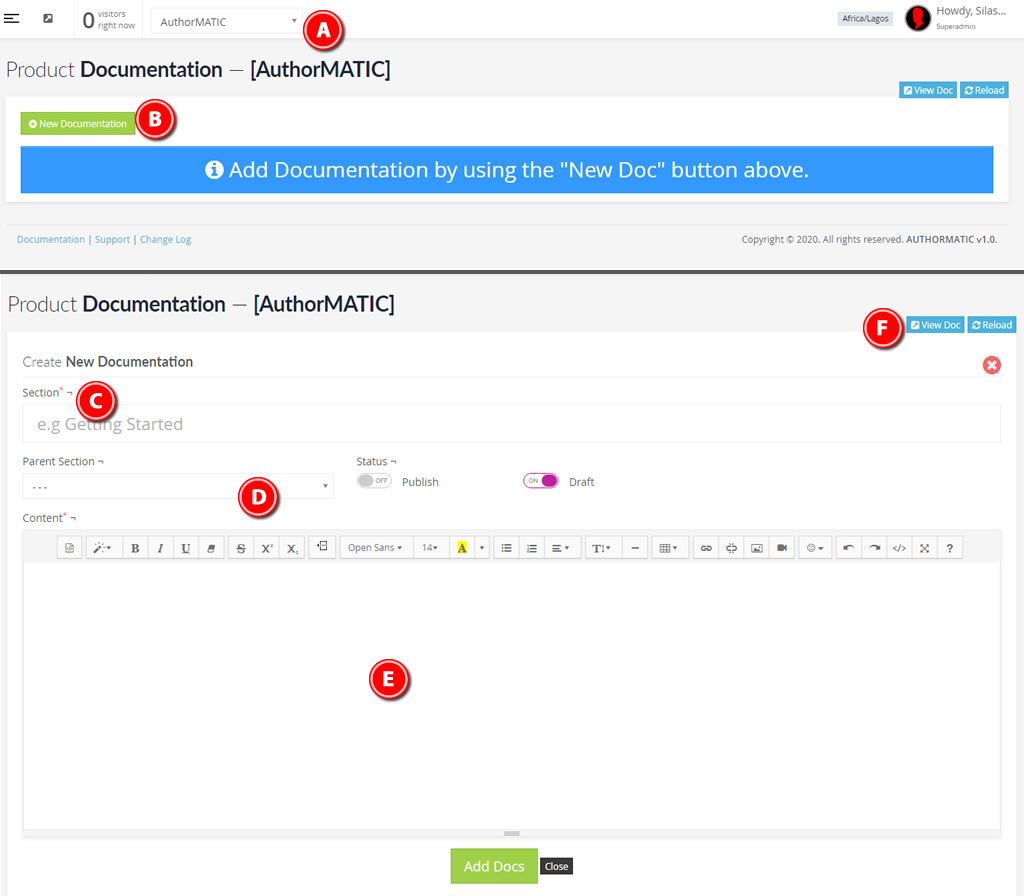
A. PRODUCT LIST - You need to select a product from the list, as active product, to add new documentation.
B. NEW DOCUMENTATION - Add new documentation with this button.
C. SECTION TITLE - This can be Parent Section or Sub-Section of your documentation.
D. PARENT SECTION - If current entry is a sub-section, you will need to select the parent section from the list. You can reload the page to reflect the recent added parent section.
E. DOCUMENTATION CONTENT - You documentation content goes here.
F. VIEW LINK - You can view the end result on the front-end with this link.
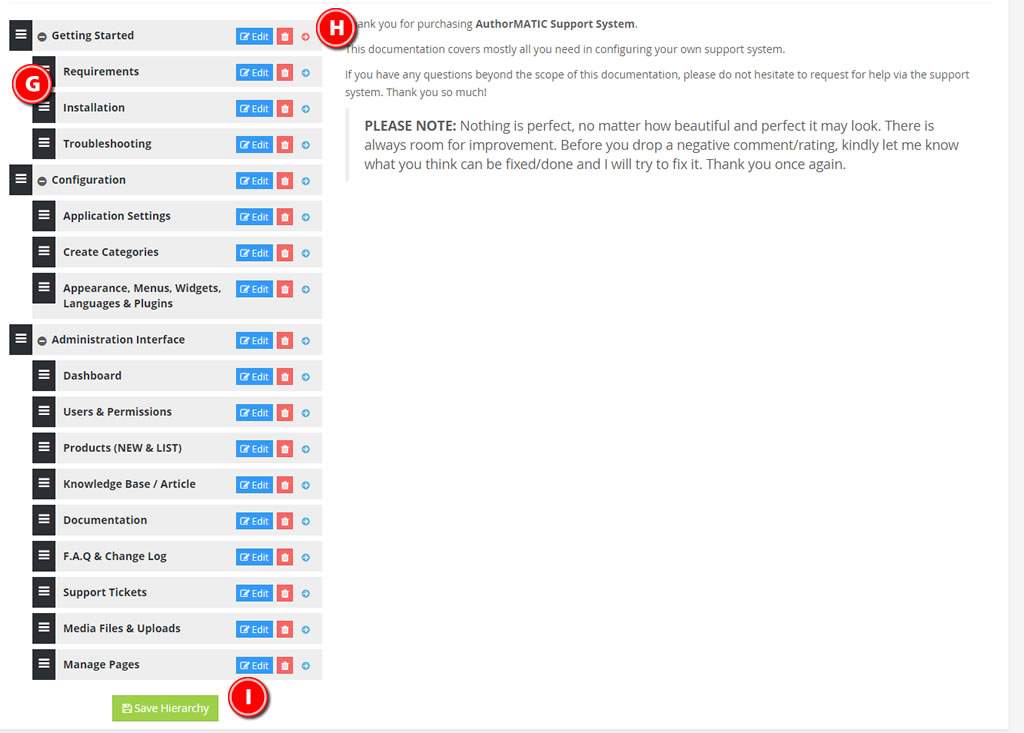
G. SORTABLE - You can easily sort your section with drag & drop.
H. VIEW/MANAGE CONTENT - Edit, Delete or Preview the content per section.
I. SAVE HIERARCHY - This button will display when you drag and sort any section.
F.A.Q & Change Log
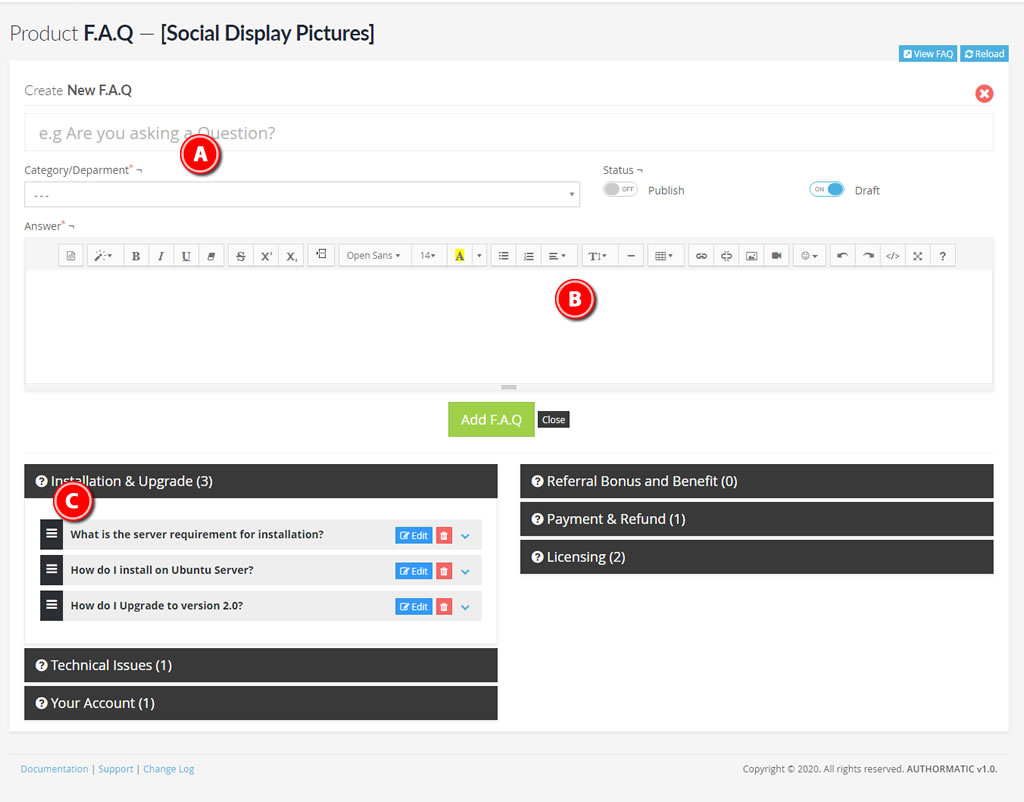
A. THE QUESTION - The common question; the question category; the status
B. THE ANSWER - The answer to the common question.
C. F.A.Q CATEGORY/DEPARTMENT - Your FAQ are grouped in categories and also sortable.
Support Tickets
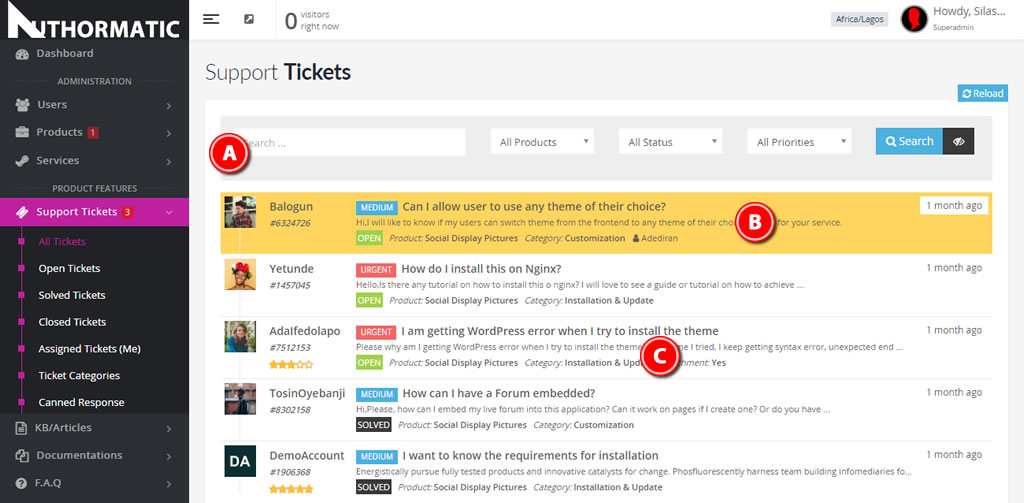
A. TICKET SEARCH - Search for any ticket with a relevant phrase/word; with the option to query by product, priority and status.
B. NEW TICKET/AWAITING RESPONSE - Ticket with yellow background shows new ticket awaiting response.
C. TICKET LIST - Quick view of all ticket request. Rating, Status, Priorities, Product, Admin assigned e.t.c
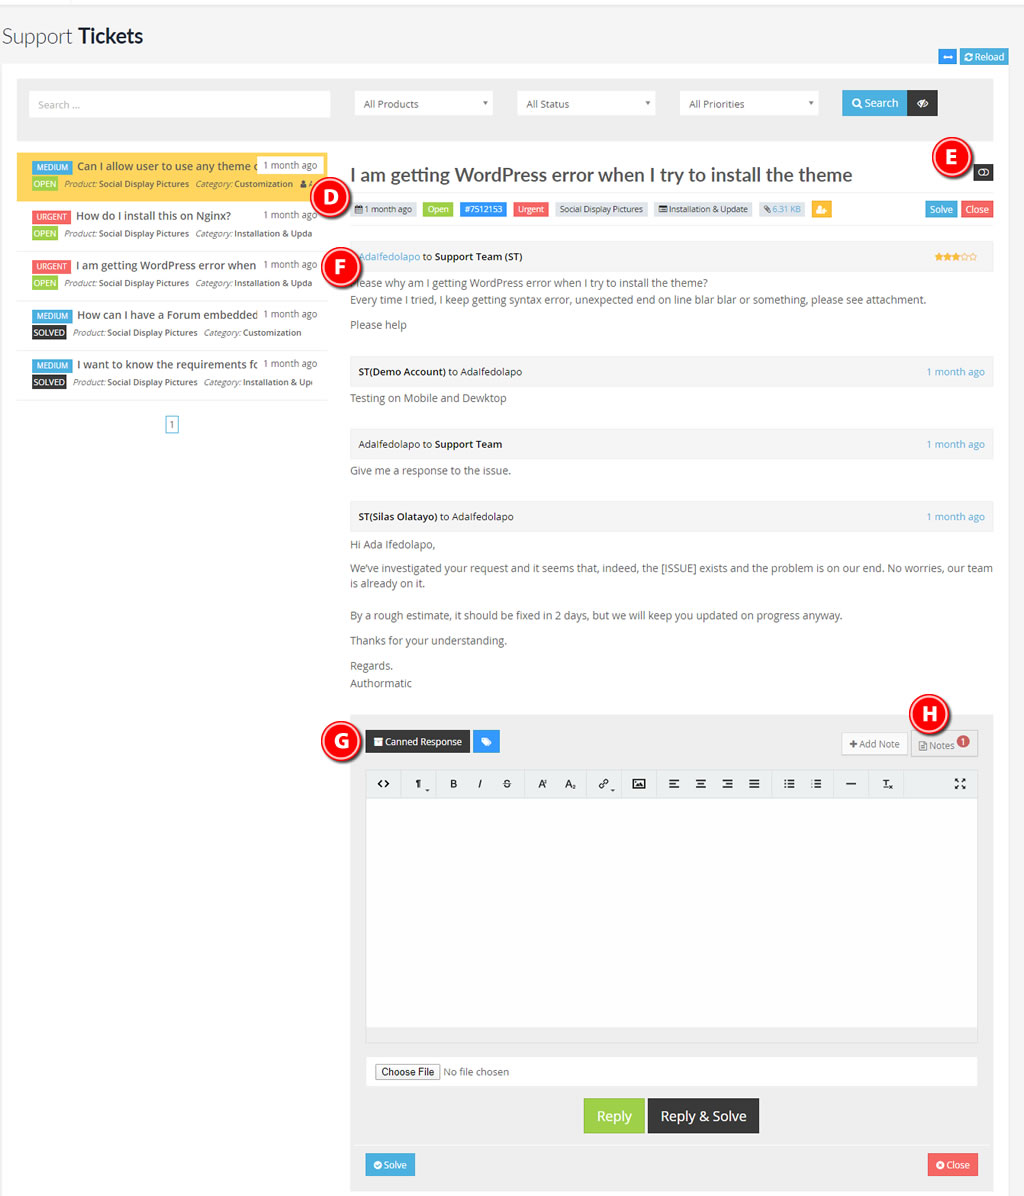
D. TICKET HEADER - The header section of the ticket that depict the basic information about the current ticket. From attachment file link, ticket category, ticket priority and status e.t.c
E. TOGGLE OLD RESPONSE - With this button you can collapse old comment, if the thread is so long.
F. USER INFORMATION - You can view the user's information in a modal window by click the name link.
G. CANNED RESPONSE - For a quick pre-defined response, canned response got you covered. Click this button to show all available canned responses.
H. ADMIN NOTES - Every admin/manager (back-end access with permission) can drop a note for other admins.
Manage Pages
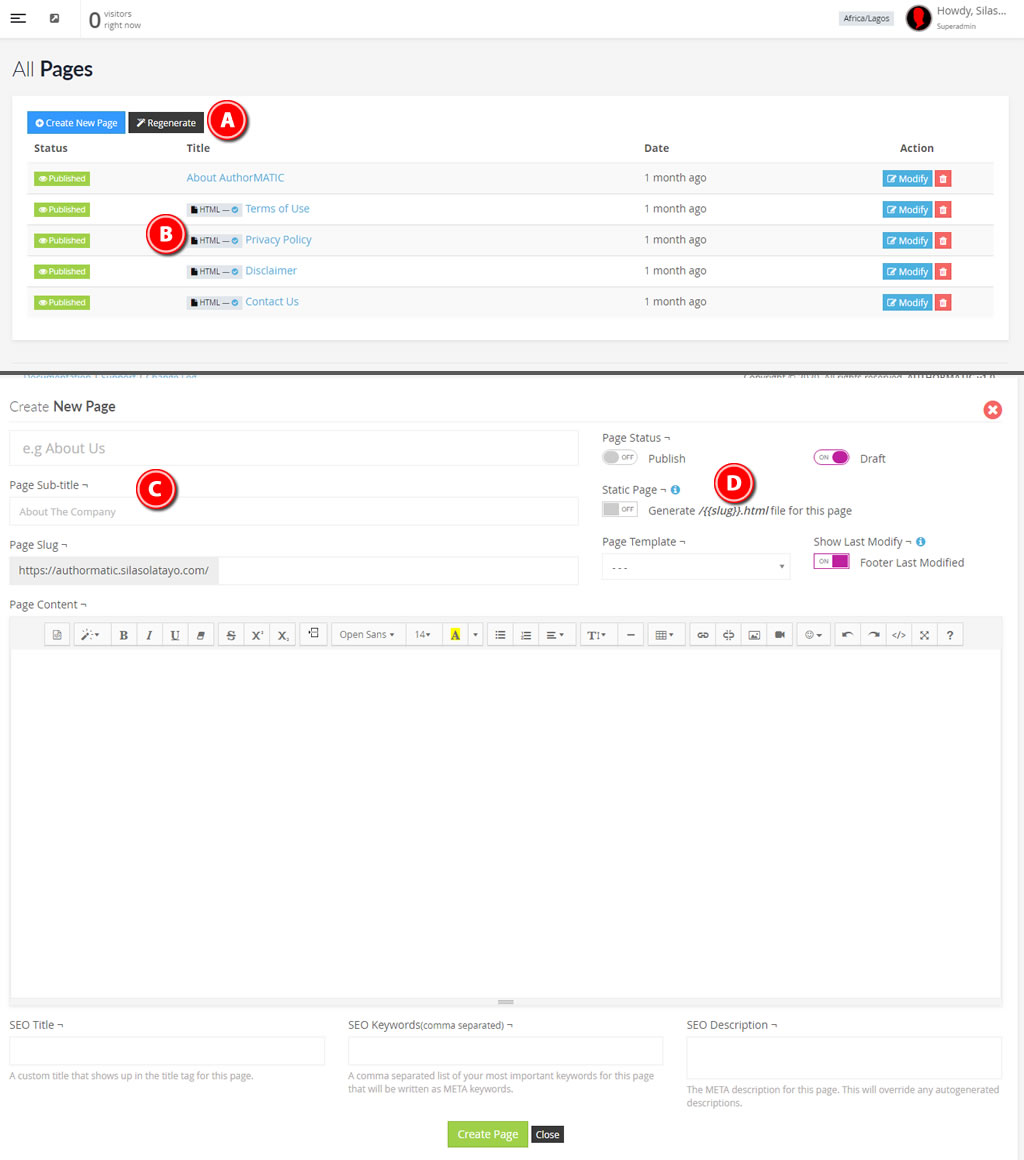
A. REGENERATE STATIC PAGES - With this button, you can regenerate all static (.html) pages.
B. HTML TAGS - This shows pages with STATIC enabled.
C. PAGE TITLE AND SUB-TITLE - Your page title and sub-title. On blur o the title field, the slug is auto-generated.
D. PAGE TEMPLATE & OPTIONS - Your theme provides page template options applicable to page creation. You can decide to show 'Last Modified Date' o the page and the end o the page.
Media Files & Uploads
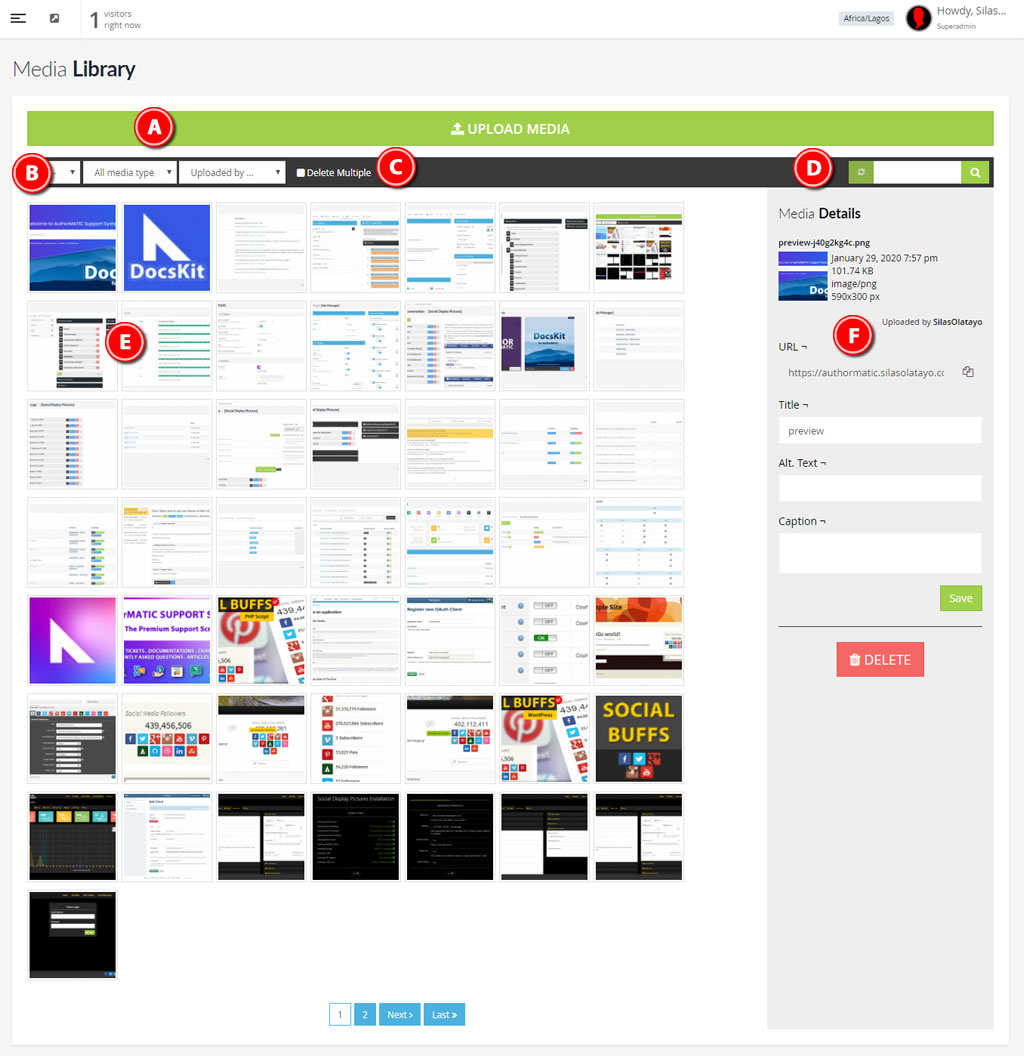
A. UPLOAD MEDIA - Click and drag & drop your media files here. Remember the system only support the allowed media extensions enable in the application settings.
B. SORT DISPLAY - Sort media files by limits, types or user.
C. DELETE MULTIPLE - When you enable this button, all selected media files will be available for deletion.
D. SEARCH - Search for any media files by name or title.
E. MEDIA LIST - Paginated list of all media file relative to sort or search options.
F. FILE DETAILS - Single media file information with option to edit or delete.
Support
If you have purchased this product and you have questions, please don't hesitate to reach out for help: https://dev.silasolatayo.com/account/tickets#new
Pre-sale questions are welcome on Codecanyon comment wall.
Change Logs
You can view all change logs for this product here: https://dev.silasolatayo.com/authormatic/change-logs